Battery switch on travel trailer function is crucial for managing your RV’s power. Understanding how it works – whether it’s a simple single switch or a more complex dual or rotary system – is key to preventing electrical issues and ensuring a safe and enjoyable camping experience. This guide will break down the different types of switches, their operation, troubleshooting tips, and safety precautions, so you can confidently manage your travel trailer’s power.
We’ll cover everything from the basics of how the switch distributes power between your house batteries and your vehicle’s starting battery to more advanced topics like integrating your battery switch with solar panels and generators. We’ll also address common problems and provide practical solutions to help you keep your system running smoothly.
Battery Switch Types in Travel Trailers
Choosing the right battery switch for your travel trailer is crucial for managing power and preventing electrical issues. Different switches offer varying levels of control and complexity, each with its own set of advantages and disadvantages. Understanding these differences will help you select the best option for your needs.
Single Battery Switch Configurations
A single battery switch is the simplest type. It’s a basic on/off switch that controls the power flow from your trailer’s battery to the 12-volt system. This is suitable for trailers with only one battery and minimal power demands. Wiring is straightforward, with the battery’s positive cable connected to the switch, then the switch to the trailer’s 12-volt system.
The negative cable connects directly to the trailer’s chassis.
Dual Battery Switch Configurations
Dual battery switches allow you to manage two batteries independently. This setup is common in larger trailers or those with high power demands. You can isolate one battery for starting the vehicle, and use the other for running appliances. The switch typically has three positions: both batteries on, battery 1 on, battery 2 on, and both off. Wiring involves connecting each battery’s positive cable to the switch, then separate outputs from the switch to the trailer’s 12-volt system.
Negative cables connect directly to the chassis, as with a single switch configuration.
Rotary Battery Switches
Rotary switches offer more control over multiple batteries, typically two or more. These switches are usually more robust and provide better isolation between batteries compared to simpler dual switches. A rotary switch allows for various combinations of battery usage, providing more flexibility in managing power. For instance, you might use one battery for house functions and another for starting the tow vehicle.
The wiring is more complex, requiring multiple connections to each battery and to the load centers.
Comparison of Battery Switch Types
| Feature | Single Switch | Dual Switch | Rotary Switch |
|---|---|---|---|
| Number of Batteries Controlled | One | Two | Two or more |
| Control Level | On/Off | Three positions (Both, 1, 2, Off) | Multiple combinations |
| Cost | Low | Medium | High |
| Maintenance | Low | Low | Low to Moderate (depending on complexity) |
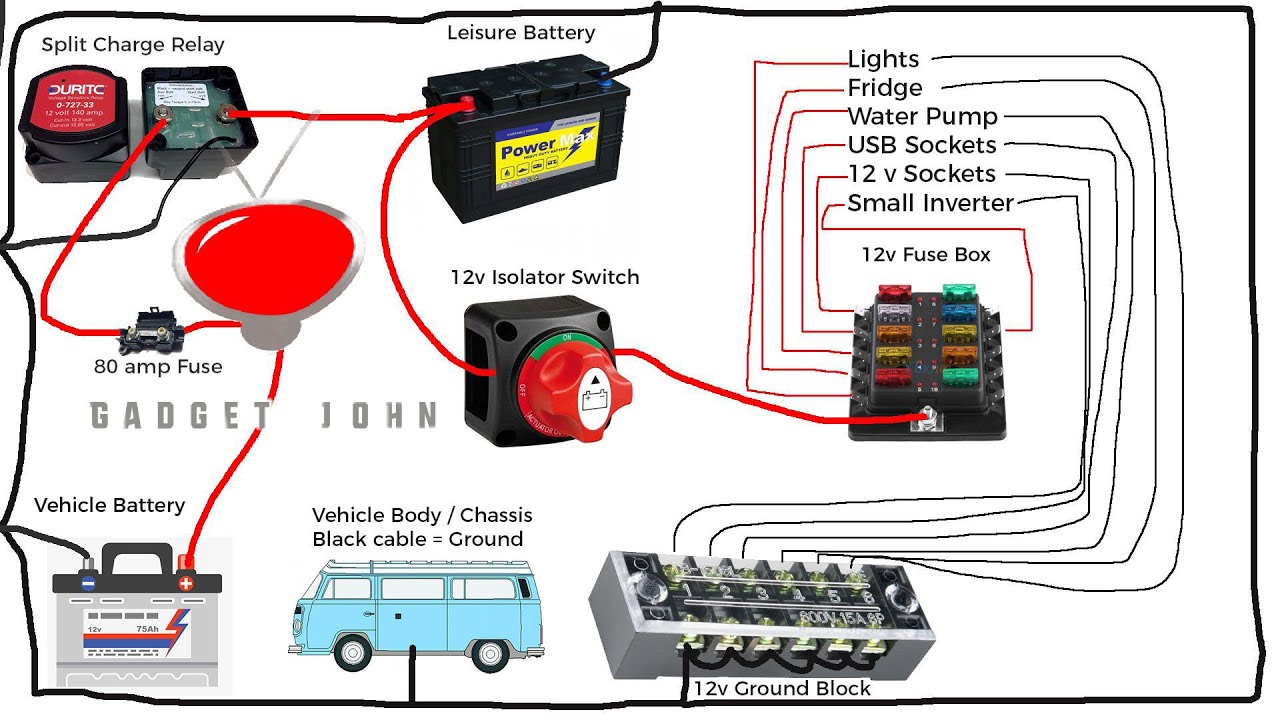
Wiring Diagrams: A Simplified Representation
While detailed wiring diagrams can be complex and vary depending on the specific components, a simplified illustration can help visualize the fundamental connections. For example, a dual battery switch would show two positive battery cables connecting to separate terminals on the switch. From the switch, two output terminals would then connect to the 12-volt system, usually a fuse panel.
So, you’re planning a trip? Awesome! First things first: get travel insurance. Seriously, check out Aon travel insurance for some solid options; you’ll thank yourself later. Then, if you’re an audiophile like me, don’t forget your tunes! Planning your audiophile travel setup beforehand is key for a blissful journey. Pack light, but pack smart – prioritizing both protection and your favorite sounds.
The negative terminals of both batteries would be connected directly to the chassis ground. A rotary switch would follow a similar principle, but with more terminals for more complex configurations. Remember to always consult the specific wiring diagram provided with your chosen switch and components.
Battery Switch and Electrical System Integration
The battery switch is the central control point for your travel trailer’s 12-volt DC system. Understanding its relationship with other electrical components is crucial for safe and efficient power management. This section details how the battery switch interacts with various power sources and the importance of proper grounding and bonding within the overall electrical system.The battery switch acts as a gatekeeper, selectively connecting or disconnecting your house batteries from the rest of the electrical system.
This allows you to control power flow, preventing accidental discharge or protecting sensitive electronics. Its integration with other components ensures a smooth and safe operation of your trailer’s electrical systems, regardless of your power source.
Converter Interaction
The converter transforms 120-volt AC shore power (or generator power) into 12-volt DC power to charge your house batteries. The battery switch allows the converter to charge the batteries only when it is in the “on” position. When the switch is off, the converter still receives AC power, but it won’t charge the batteries, protecting them from overcharging.
So, you’re planning a trip? Awesome! First things first: get yourself sorted with travel insurance. Check out Aon travel insurance for solid coverage. Once that’s done, think about your in-flight entertainment. If you’re an audiophile, digging into a proper audiophile travel setup before you go will make those long flights a breeze.
Seriously, good headphones are a game-changer.
Inverter Interaction
An inverter converts 12-volt DC power from your batteries into 120-volt AC power for appliances that require AC. The battery switch controls the DC power supply to the inverter. With the switch off, the inverter is powerless, preventing accidental battery drain. A properly functioning inverter will also typically have its own internal safety mechanisms to prevent over-discharge.
Solar Panel Interaction
Solar panels generate DC power. A charge controller regulates this power and sends it to the batteries. The battery switch, when on, allows the charged power to flow into the batteries. When off, the charge controller will typically cease charging to prevent overcharging. Some more advanced systems might include a bypass feature that allows solar power to continue charging even with the battery switch off, depending on the setup.
Interaction with Different Power Sources
The battery switch’s role changes depending on the active power source. With shore power connected, the converter charges the batteries, and the battery switch manages this charging process. If using a generator, the same principle applies. Solar power charging is independent of the battery switch in some systems, but the switch always controls the use of battery power for the trailer’s 12V system.
Grounding and Bonding
Proper grounding and bonding are critical for safety and preventing electrical damage. The battery switch should be properly grounded to the trailer’s chassis. This ensures that any stray electrical current is safely directed to the ground, preventing shocks and protecting electrical components. All metallic parts of the trailer should be bonded together to create a single, unified ground plane.
This prevents voltage differences between metal parts, reducing the risk of corrosion and electrical problems.
Travel Trailer Electrical System Diagram
| Component | Description | Connection to Battery Switch |
|---|---|---|
| Shore Power Inlet | Connects to external AC power source. | Indirect (via converter) |
| Converter | Converts AC to DC power. | Direct (charges batteries when switch is on) |
| Battery Switch | Controls power flow to and from batteries. | Central Control Point |
| House Batteries | Provides 12V DC power. | Directly controlled by the switch. |
| Inverter | Converts DC to AC power. | Direct (powered when switch is on) |
| Solar Panel(s) | Generates DC power. | Indirect (via charge controller, may bypass switch) |
| 12V Appliances | Operate on 12V DC power. | Direct (powered when switch is on) |
| 120V Appliances | Operate on 120V AC power. | Indirect (via inverter) |
Upgrading or Replacing a Battery Switch: Battery Switch On Travel Trailer Function
Upgrading or replacing your travel trailer’s battery switch is a common maintenance task that can significantly improve your camping experience. A faulty switch can lead to power problems, leaving you stranded without lights or appliances. Choosing the right replacement depends on several factors, including your trailer’s electrical system and your power needs.
Factors to Consider When Upgrading or Replacing a Battery Switch
Several key factors influence the selection of a new battery switch. The size of your battery bank directly impacts the amperage rating needed. Larger battery banks require higher amperage switches to handle the increased current. Consider also the number of batteries you have; a switch capable of handling multiple batteries in parallel or series will be necessary.
Finally, the type of switch (e.g., single-pole, double-pole, double-throw) should match your trailer’s wiring configuration.
Comparing Battery Switch Specifications
Battery switches are available in various amperage ratings, typically ranging from 75 amps to 200 amps or more. Higher amperage ratings are crucial for larger battery banks and higher-power appliances. Consider the physical size and mounting style. Some switches are designed for surface mounting, while others are designed for recessed mounting. Material quality also plays a role; look for switches made from durable, corrosion-resistant materials.
Some higher-end switches incorporate features like LED indicators showing battery status or built-in circuit breakers for added safety. For example, a 100-amp switch might be suitable for a moderate-sized travel trailer with a single group 27 battery, while a 200-amp switch would be necessary for a larger trailer with multiple deep-cycle batteries.
Safely Removing and Installing a New Battery Switch
Before beginning any electrical work, always disconnect the negative battery cable to prevent accidental shorts or shocks. Carefully remove the old battery switch, noting the wiring configuration before disconnecting any wires. Take photos to aid in reinstallation. Clean the mounting surface thoroughly. Install the new switch, ensuring a secure connection.
Connect the wires according to the original configuration, double-checking your work before reconnecting the negative battery cable. Test the switch thoroughly to ensure it’s functioning correctly. This procedure minimizes the risk of electrical damage or injury.
Choosing a Suitable Battery Switch Based on the Trailer’s Electrical System, Battery switch on travel trailer function
The choice of battery switch is directly tied to the trailer’s electrical system. If your trailer has a simple system with a single battery and minimal power demands, a lower-amperage switch might suffice. However, for trailers with multiple batteries, inverters, and high-power appliances, a higher-amperage switch is essential. Understanding your trailer’s electrical demands is critical for selecting an appropriately sized switch.
A mismatched switch could lead to overheating, damage, or even fire. For example, a travel trailer with a 1000-watt inverter and multiple batteries might require a 200-amp switch or even higher, depending on the inverter’s draw and the battery configuration. Consulting your trailer’s wiring diagram can help determine the correct amperage rating.
Mastering your travel trailer’s battery switch is essential for reliable power and safe operation. By understanding the different types of switches, their functions, and potential problems, you’ll be well-equipped to handle any electrical situation on the road. Remember to always prioritize safety and consult a professional if you’re unsure about any aspect of your RV’s electrical system. Happy travels!
Question & Answer Hub
What happens if I leave my battery switch on all the time?
Leaving your battery switch on constantly can drain your house batteries, especially if you’re not connected to shore power. It’s best to turn it off when not using the trailer to conserve battery life.
How do I know which type of battery switch I have?
Look at the switch itself; single switches have one position, duals have two, and rotaries have multiple positions. Check your owner’s manual for specifics.
Can I use a battery switch to connect a generator?
Some battery switches allow for generator connection, but others don’t. Check your switch’s specifications and wiring diagram to be sure. Improper connections can damage your equipment.
My battery switch is corroded. What should I do?
Clean the terminals with a wire brush and baking soda solution. Apply a corrosion inhibitor to prevent future corrosion. If the corrosion is severe, replace the switch.
